Well, here comes the compilation of Adobe Photoshop...I have to come out with an e-wallpaper for MMU FOM Open Day on 21st March 2012...I started with the 5 images that i have chosen...
I don't like the road so I use the Clone Stamp tool to turn it into grass...
Then i go to Layer>Styles to do some custom edits...
After that, I use the Adjustment tool to increase the contrast...
After that, I add another effect called Fresco...
Next, I move the graduate image to the FOM building...
It seems that the graduate image is not so obvious...so, I added some effects through the Styles menu again...
Now, its time to move on to the other images...I duplicated the degree image and rotate it...
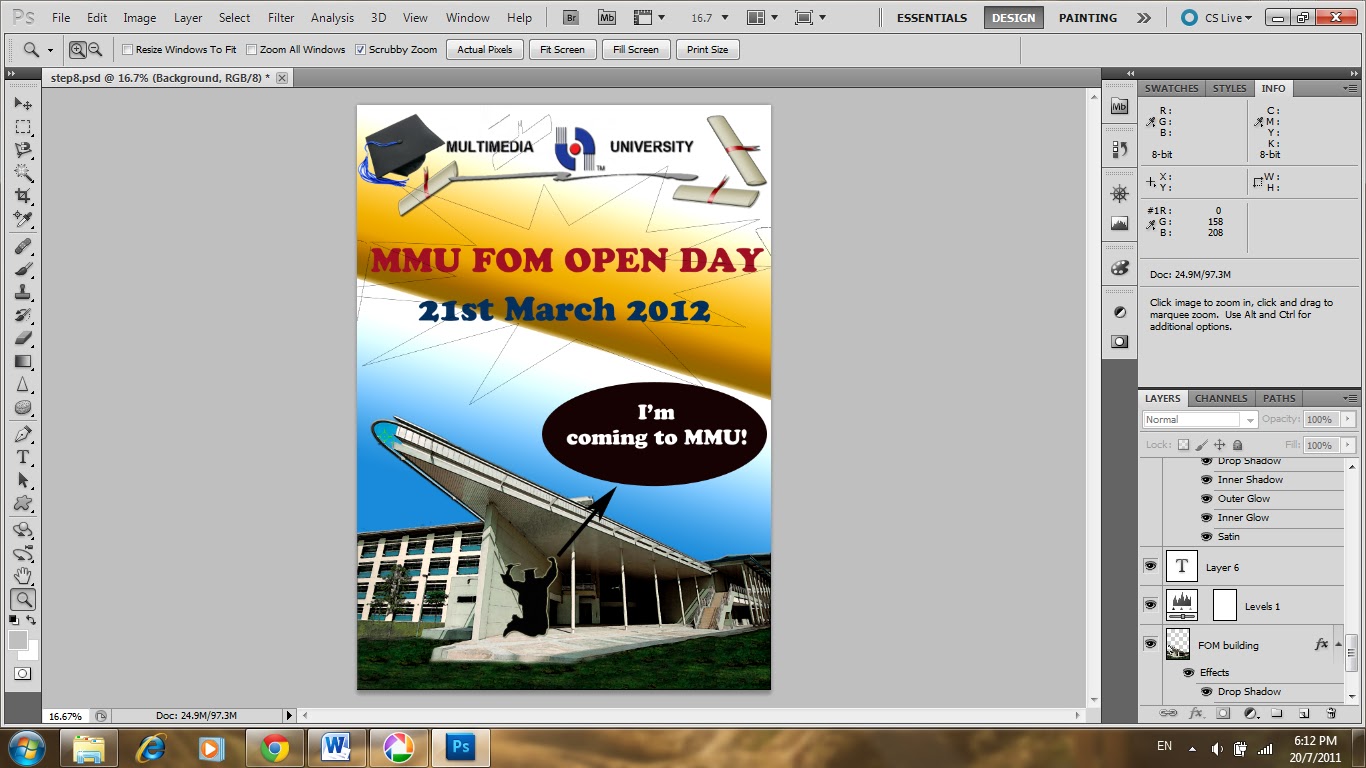
Next, I want to make the images look more appealing and attractive so, once again I move on to the Styles menu...Then, I add the effects including Stroke...You can see what effects are done at the bottom right corner under the layers...
After that, I added text using the Horizontal Type Tool and I even added arrows and shapes using the Elipse tool and Line tool...
I also added a Star shape behind the text to make it more attractive...
Lastly, i use the gradient tool to light up the background...
That is my final result for e-wallpaper! Actually, there are many more effects that you can explore but as I am a beginner, I am satisfied with this.. Thank you! :)
Friday, 22 July 2011
Thursday, 14 July 2011
Retouching and Enhancing Digital Photographs
Now we have come to the retouching part!! Woohoo! Wait! Do you even know what is retouching? Touch the picture again?? Haha.. It's basically making the photo look better with effects and remove or add whatever you want or don't want..
For now, I will show you some of the basic skills of retouching...I select the FOM building picture for this...
I don't like the roads to be seen and I prefer the land would be all grass...So, now I will use a clone stamp tool to make it work!
After clicking the clone stamp tool, now hold Alt and use left click on your mouse to drag it along the grass area..Then release the Alt button and just using left click, drag it at the road..It will end up like this...
Oh ya! You can actually adjust your brush size for the difficult parts...Here, I'll show you..
Ok, now we'll move on to the basic effects in Adobe Photoshop...Here I'll be using the sponge tool...
I used the sponge tool on the grass in which certain part I make it more saturated and certain part its desaturated..
Next, I use the Auto Tone function at the Image menu...
Next, I also tried using Shadows/Highlights...
It end up like this...
Now, I want to insert the Graduate photo into this image of the FOM building...I want to retouch it too...xD
I use the Hue/Saturation and Shadow/Highlights skill again here....I'm still new and so I don't know much about the other effects yet...But I will explore it and share it here again next time!
Lastly, you can try adjusting the colours, brightness and so on...for example, you can use the level function and customize your own adjustments...
That's roughly all the basics for retouching and enhancing digital photographs...See you all next time!
Sunday, 26 June 2011
Tutorial 1 ( Selection )
Welcome to the first step of my journey. The first destination is the adobe photoshop selection process. I will show you how to select the images that you want from the raw images.
First of all, you need to search for raw images from the web. These are the raw images that I selected :
Now we will proceed to the selection.
Let's start with the FOM building. First, open the file or the image using Adobe Photoshop. Then, use the rectangular marquee tool (second top left menu) select the area you want to select by simply clicking and dragging on the image.
Then, click on the magic wand tool (fourth top left menu) and click on the areas that you don't want to have in your selection. This process might need some patience so be careful and the result will be something like this.
Next, just click on the move tool ( first top left menu ) and move it to a new clipboard and you will have something like this.
Allright, we are done with the FOM building selection so we will now move on to the graduate image. Open the image just like what we did for the FOM building.
Next, use the rectangular marquee tool again and do the same.
After that, use the magic wand tool and do the same thing. It will turn out like this.
Then, just drag it to the other clipboard by using the move tool.
Here you go. Two images already been selected. You can do the same for the other images as well.
I forgot to show you guys on how to drag it to another clipboard. Sorry for that. No worries, I'll show it here.
After you have done selecting the image, just create a new clipboard by going to File<New<International Paper. Then, click on the Arrange Documents icon as shown below and choose whichever style you like.
After choosing the document arrangement, you will have something like this.
Then, just click on the move tool and drag it to the other clipboard. You'll now have 4 images.
Now, I want to duplicate the degree image and rotate it. So, here's something new to learn. Watch and learn. First, select the degree image using the same method and then go to Edit<Transform<Rotate.
After that, now we'll see how to duplicate it. Make sure you select the image first and then, hold ALT on your keyboard and drag the image using the left click on your mouse.
Now we have two degree images!! Isn't that cool? Allright, so you can use the same steps for other images as well. And I had add in another image which is the MMU logo to the selection. Hence, all together I have five images.
I have a rough idea on how to arrange the images for the FOM Open Day design. It will look something like this.
I will add some texts in between the images so stay with me along my journey and we'll see where it goes...
Thank you for your time!
First of all, you need to search for raw images from the web. These are the raw images that I selected :
![]() |
The FOM building |
![]() |
A graduate |
![]() |
Graduate hat |
![]() |
a degree |
MMU logo |
Let's start with the FOM building. First, open the file or the image using Adobe Photoshop. Then, use the rectangular marquee tool (second top left menu) select the area you want to select by simply clicking and dragging on the image.
Then, click on the magic wand tool (fourth top left menu) and click on the areas that you don't want to have in your selection. This process might need some patience so be careful and the result will be something like this.
Next, just click on the move tool ( first top left menu ) and move it to a new clipboard and you will have something like this.
Allright, we are done with the FOM building selection so we will now move on to the graduate image. Open the image just like what we did for the FOM building.
Next, use the rectangular marquee tool again and do the same.
After that, use the magic wand tool and do the same thing. It will turn out like this.
Then, just drag it to the other clipboard by using the move tool.
Here you go. Two images already been selected. You can do the same for the other images as well.
I forgot to show you guys on how to drag it to another clipboard. Sorry for that. No worries, I'll show it here.
After you have done selecting the image, just create a new clipboard by going to File<New<International Paper. Then, click on the Arrange Documents icon as shown below and choose whichever style you like.
After choosing the document arrangement, you will have something like this.
Then, just click on the move tool and drag it to the other clipboard. You'll now have 4 images.
Now, I want to duplicate the degree image and rotate it. So, here's something new to learn. Watch and learn. First, select the degree image using the same method and then go to Edit<Transform<Rotate.
After that, now we'll see how to duplicate it. Make sure you select the image first and then, hold ALT on your keyboard and drag the image using the left click on your mouse.
Now we have two degree images!! Isn't that cool? Allright, so you can use the same steps for other images as well. And I had add in another image which is the MMU logo to the selection. Hence, all together I have five images.
I have a rough idea on how to arrange the images for the FOM Open Day design. It will look something like this.
I will add some texts in between the images so stay with me along my journey and we'll see where it goes...
Thank you for your time!
Saturday, 25 June 2011
JoiN Me in My JouRneY~
Hi everyone,
This blog is about my journey into the digital media world. I hope all of you could join me in my journey but before that, I would like to introduce myself.
Name: Tan Chin Hwa aka Frog
Age: 20
Hometown: The pearl of the Orient (Penang)
Course: BBA (Hons) Management with Multimedia, Gamma year, 1st Semester
Class Section: BC271 A
Along this journey, I will step into the 3 basic functions of digital media which is Adobe Photoshop, Flash, and
Adobe Dreamweaver which I have NO idea at all on how to use them...
and I hope that by moving along in my journey, we will all learn something new together..
Lastly, WELCOME to My JouRneY!!!
So, let's move on to the journey and we'll see where it goes...:)
Subscribe to:
Posts (Atom)